设置GPU 1 2 3 from tensorflow.config.experimental import list_physical_devices, set_memory_growthphysical_devices = list_physical_devices('GPU' ) set_memory_growth(physical_devices[0 ], True )
1 2 3 4 5 6 import osimport timeimport numpy as npimport matplotlib.pyplot as pltimport cv2import tqdm
人脸数据采集 1 2 3 4 5 6 num = 200 img_dir = 'images' name = 'luoming' time_delay = 0 wait_key = 200
1 2 3 4 5 6 7 8 9 10 11 12 13 14 name_path = os.path.join(img_dir, name) if not os.path.exists(name_path): os.makedirs(name_path) camera = cv2.VideoCapture(0 ) for i in tqdm.tqdm(range (num)): success, img = camera.read() if success: img_name = str (i) + '.jpg' cv2.imshow(img_name, img) cv2.waitKey(wait_key) cv2.destroyAllWindows() cv2.imwrite(os.path.join(name_path, img_name), img) camera.release()
100%|█████████████████████████████████████████████████| 20/20 [00:04<00:00, 4.01it/s]
将人脸信息从图片中筛选出来 1 2 faceCascade = cv2.CascadeClassifier('haarcascade_frontalface_default.xml' ) faceCascade.load(r'haarcascade_frontalface_default.xml' )
True
1 gray_img = cv2.imread('images/luoming/10.jpg' , 0 )
1 2 3 4 5 faces = faceCascade.detectMultiScale(gray_img, scaleFactor=1.15 , minNeighbors=5 , minSize=(5 , 5 ))
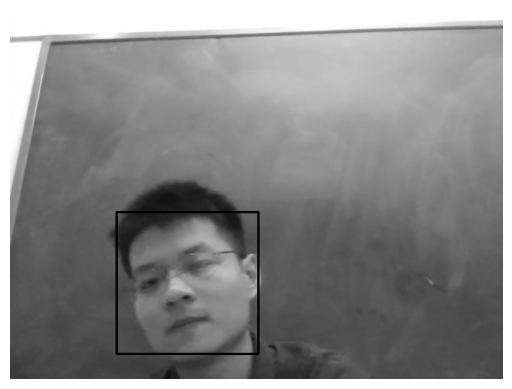
1 2 3 4 5 for (x, y, w, h) in faces: cv2.rectangle(gray_img, (x, y), (x + h, y + w), (0 , 0 , 255 ), 2 ) plt.imshow(gray_img, cmap='gray' ) plt.axis('off' ) plt.show()
1 2 3 4 5 for (x, y, w, h) in faces: face = gray_img[y:y + h, x:x + w] plt.imshow(face, cmap='gray' ) plt.axis('off' ) plt.show()
数据的预处理 1 2 faceCascade = cv2.CascadeClassifier('haarcascade_frontalface_default.xml' ) faceCascade.load(r'haarcascade_frontalface_default.xml' )
True
1 2 3 4 5 6 7 8 9 10 11 12 13 14 15 16 17 18 peoples = os.listdir('images/' ) for people in peoples: img_names = os.listdir('images/' + people) for img_name in img_names: img_path = 'images/' + people + '/' + img_name img = cv2.imread(img_path, 0 ) faces = faceCascade.detectMultiScale(img, scaleFactor=1.15 , minNeighbors=5 , minSize=(5 , 5 )) for (x, y, w, h) in faces: face = img[y:y + h, x:x + w] face = cv2.resize(face, (64 , 64 )) if not os.path.exists('face_images/' + people): os.mkdir('face_images/' + people) cv2.imwrite('face_images/' + people + '/' + img_name, face)
读取处理好的数据 1 2 3 4 5 6 7 8 9 10 11 path = 'face_images/' names = os.listdir(path) names_dic = {i:j for i, j in enumerate (names)} imgs = [] labels = [] for i in range (len (names)): img_names = os.listdir(path + names[i]) for j in range (len (img_names)): labels.append(i) img = cv2.imread(path + names[i] + '/' + img_names[j], 0 ) imgs.append(img)
{0: 'hexianbin',
1: 'huhuijuan',
2: 'luoming',
3: 'maiguoxuan',
4: 'yanghui',
5: 'yuchundi',
6: 'zhangmin'}
1 2 labels = np.array(labels) imgs = np.array(imgs)
1 2 imgs = np.expand_dims(imgs, -1 ) imgs.shape
(1811, 64, 64, 1)
(1811,)
切分训练集和测试集 1 from sklearn.model_selection import train_test_split
1 x_train, x_test, y_train, y_test = train_test_split(imgs, labels, test_size=0.2 )
模型的搭建 1 2 3 4 5 from tensorflow import kerasfrom tensorflow.keras import layersfrom tensorflow.keras import lossesfrom tensorflow.keras import metricsfrom tensorflow.keras import optimizers
1 2 3 4 5 6 7 8 9 10 11 12 13 14 15 16 17 18 19 20 21 22 23 24 model = keras.Sequential(name='LeNet5' ) model.add(keras.layers.Conv2D(filters=6 , kernel_size=(5 , 5 ), strides=(1 , 1 ), input_shape=(64 , 64 , 1 ), activation='relu' )) model.add(keras.layers.MaxPool2D()) model.add(keras.layers.Conv2D(filters=16 , kernel_size=(5 , 5 ), strides=(1 , 1 ), activation='relu' )) model.add(keras.layers.MaxPool2D()) model.add(keras.layers.Flatten()) model.add(keras.layers.Dense(units=120 , activation='relu' )) model.add(keras.layers.Dense(units=84 , activation='relu' )) model.add(keras.layers.Dense(units=len (names_dic), activation='softmax' ))
Model: "LeNet5"
_________________________________________________________________
Layer (type) Output Shape Param #
=================================================================
conv2d (Conv2D) (None, 60, 60, 6) 156
max_pooling2d (MaxPooling2D (None, 30, 30, 6) 0
)
conv2d_1 (Conv2D) (None, 26, 26, 16) 2416
max_pooling2d_1 (MaxPooling (None, 13, 13, 16) 0
2D)
flatten (Flatten) (None, 2704) 0
dense (Dense) (None, 120) 324600
dense_1 (Dense) (None, 84) 10164
dense_2 (Dense) (None, 7) 595
=================================================================
Total params: 337,931
Trainable params: 337,931
Non-trainable params: 0
_________________________________________________________________
模型的编译和训练 1 model.compile (optimizer='adam' , loss=losses.sparse_categorical_crossentropy, metrics=metrics.sparse_categorical_accuracy)
1 model.fit(x_train, y_train, epochs=10 , batch_size=16 , validation_split=0.2 )
Epoch 1/10
73/73 [==============================] - 3s 10ms/step - loss: 1.8038 - sparse_categorical_accuracy: 0.7712 - val_loss: 0.1824 - val_sparse_categorical_accuracy: 0.9621
Epoch 2/10
73/73 [==============================] - 0s 5ms/step - loss: 0.0663 - sparse_categorical_accuracy: 0.9827 - val_loss: 0.1057 - val_sparse_categorical_accuracy: 0.9759
Epoch 3/10
73/73 [==============================] - 0s 5ms/step - loss: 0.0149 - sparse_categorical_accuracy: 0.9940 - val_loss: 0.1166 - val_sparse_categorical_accuracy: 0.9724
Epoch 4/10
73/73 [==============================] - 0s 5ms/step - loss: 0.0019 - sparse_categorical_accuracy: 1.0000 - val_loss: 0.1207 - val_sparse_categorical_accuracy: 0.9793
Epoch 5/10
73/73 [==============================] - 0s 5ms/step - loss: 6.2106e-04 - sparse_categorical_accuracy: 1.0000 - val_loss: 0.1251 - val_sparse_categorical_accuracy: 0.9897
Epoch 6/10
73/73 [==============================] - 0s 5ms/step - loss: 7.1165e-05 - sparse_categorical_accuracy: 1.0000 - val_loss: 0.1209 - val_sparse_categorical_accuracy: 0.9862
Epoch 7/10
73/73 [==============================] - 0s 5ms/step - loss: 3.7305e-05 - sparse_categorical_accuracy: 1.0000 - val_loss: 0.1226 - val_sparse_categorical_accuracy: 0.9862
Epoch 8/10
73/73 [==============================] - 0s 5ms/step - loss: 2.8110e-05 - sparse_categorical_accuracy: 1.0000 - val_loss: 0.1229 - val_sparse_categorical_accuracy: 0.9862
Epoch 9/10
73/73 [==============================] - 0s 6ms/step - loss: 2.2306e-05 - sparse_categorical_accuracy: 1.0000 - val_loss: 0.1235 - val_sparse_categorical_accuracy: 0.9862
Epoch 10/10
73/73 [==============================] - 0s 5ms/step - loss: 1.8790e-05 - sparse_categorical_accuracy: 1.0000 - val_loss: 0.1236 - val_sparse_categorical_accuracy: 0.9862
<keras.callbacks.History at 0x20fb6835c70>
模型验证 1 model.evaluate(x_test, y_test)
12/12 [==============================] - 0s 8ms/step - loss: 0.0387 - sparse_categorical_accuracy: 0.9862
[0.03873365744948387, 0.9862259030342102]
模型的测试 1 2 3 4 camera = cv2.VideoCapture(0 ) success, img = camera.read() camera.release()
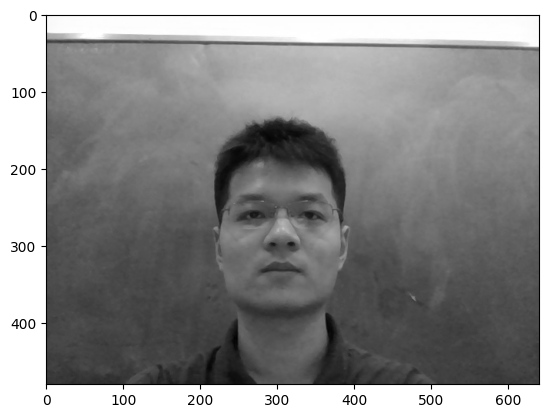
1 2 plt.imshow(img[:, :, ::-1 ]) plt.show()
1 2 gray_img = cv2.cvtColor(img, cv2.COLOR_BGR2GRAY)
1 2 plt.imshow(gray_img, cmap='gray' ) plt.show()
1 2 3 4 5 faces = faceCascade.detectMultiScale(gray_img, scaleFactor=1.15 , minNeighbors=5 , minSize=(5 , 5 ))
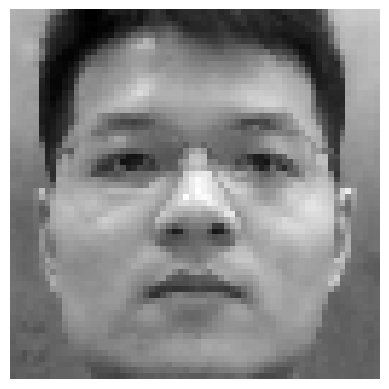
1 2 3 4 5 6 for (x, y, w, h) in faces: face = gray_img[y:y + h, x:x + w] face = cv2.resize(face, (64 , 64 )) plt.imshow(face, cmap='gray' ) plt.axis('off' ) plt.show()
1 2 3 face = np.expand_dims(face, 0 ) face = np.expand_dims(face, -1 ) face.shape
(1, 64, 64, 1)
1 index_pred = model.predict(face).argmax(axis=1 )
1/1 [==============================] - 0s 16ms/step
1 2 names_dic[index_pred[0 ]]
'luoming'
模型保存